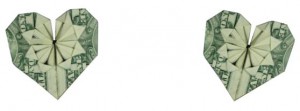
This model is a lot of fun to make and to share… great for leaving an unusual tip for great service, making an out-of-the-ordinary cash gift, or simply entertaining people. The example below uses a U.S. $1 bill:
1. I like to start with George Washington face up. Use as crisp a bill as you can find, as that will make it easier to fold and make nice sharp creases. Position the bill as shown below (A.), and then fold each of the bottom corners up to meet the top edge of the bill (B.). Crease well and unfold. The resulting creases should look like (B2.).

2. Next, do the same with the top two corners, folding them down to meet the bottom edge of the bill, as in (C.). Crease folds well and unfold. See resulting creases shown in (C1) & (C2). All these folds are called “valley folds”, as the “peak” is at the bottom (like a valley). The reverse of this fold, which we’ll see in the next step, is called a “mountain fold”….

3. Now we want to fold each side of the bill back in a mountain fold, at the precise point where the “X” creases on either side of the bill intersect. We will make two folds, with the result shown in (D.); the creases are shown in (D1); ignore the red circles until the next step. Note that the blue crease lines are a combination of dashes and dots, representing a mountain fold. The “X” creases are valley folds. Be sure to crease all folds very well.

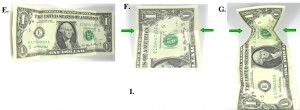
4. Note in figure (D.) that the mountain fold creases point up. With your index finger, poke down just the point at the intersection of your creases on each side of the bill, marked with the red circles in (D1.). The result should look like (E.) and the close-up in (F.) below. Turn your bill a quarter turn to the left as in (F.) and, with an index finger on each side, start to bring the points indicated with the green arrows in (F.) in toward each other, as shown in (G.). Continue to bring them together; as you do, the upper portion of the bill will fold down over them — this should happen quite naturally due to the creases you have made. The result should look like (H.). Repeat this fold on the opposite end of the bill; the result is shown in (I.).

5. Turn your model so George is once again right side up (J.). Next fold the entire unit in half, from right to left, as in (K.). Note the yellow crease lines shown in (K.); fold the upper and lower right-side corners along those lines, so your model looks like (L.). Using the inner edge of those folds as a guide (indicated by the yellow crease line in L.), fold the top layer of the left-hand point over to the right. The result is shown in figure (M.).

6. Note that the upper layer of the top and bottom points of the model each have a “flap” on the right and left sides (see N.). Following the indications of the arrows and crease lines shown in (O.), fold the tips of the flaps on each side out to meet the left or right points of the model. Figure (P.) shows the upper right flap folded out to the right point; crease well. The lower right flap is folded to that same point in figure (Q.), and the left side folds are shown complete in figure (R.).

7. Now we start to have some fun! Take the upper right flap you folded in the previous section, and gently press on the tip to open it up a bit — see the result in figure (S.). Continue to press (as in T. ), bringing the top point down to the center of the model and forming a small square shape. Crease the folds well; the result is shown in (U.). Do the same with each of the remaining three flaps; the end result should look like (V.).

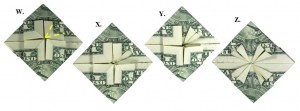
8. Figure (W.) is the same as (V.). with the addition of yellow crease lines on the upper right square folded in the previous step. Fold the two corner points in to meet in the middle, along the crease lines indicated—the first fold is shown in (X.) and the second in (Y.). Crease well. Do the same on the three other squares; the result should look like (Z.).
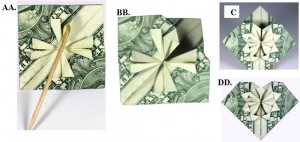
9. Next we do some folds similar to the “squash” folds you did to create the squares in step 7. You are going to open up each of the flaps you just folded in step 8 and squash the top down flat to create a kite-like shape. These flaps are quite small, so it will be useful to use a toothpick to open them up — see figure (AA.). See the completed fold in figure (BB.). Now do the same fold with the remaining seven flaps… The result should look like figure (CC.).Now fold the back of the model back to meet the bottom point and crease. You will be able to see your heart taking shape (figure DD.). You’re almost there!
10. Finally, fold the right and left points back, and there is your heart (EE.)! Figure( FF.) shows the heart from the back.

Use the heart as is, as a gift or tip. Or put it on the front of a card — use a tiny piece of double sided tape to do that, or better yet a removable glue dot. They are nice to leave as a tip, and you can use the folded piece in the back to “hang” it on the portfolio your restaurant check arrives in, or on a glass, or wherever appeals to you. You can also tuck a quarter snugly in to the front of the heart, held in place by some of model’s points. Some people call this a “change of heart”…..

Have fun!

Howdy
I just checked out your website easyorigamicrafts.com and your site takes longer than 3 seconds to load 🙁
If your site takes so Long Time To Load you are losing more than half your traffic & 50% of visitors won’t return if they have trouble loading a page…
That’s a really expensive mistake to make, specially if you are paying for traffic. I can help you to improve that.
Please contact me by my email for details: wp_optimiser@consultant.com
Regards,
Horne
Very quickly this site will be famous amid
all blogging people, due to it’s nice articles
Hi blogger, i must say you have high quality articles here.
Your website should go viral. You need initial traffic boost only.
How to get it? Search for: Mertiso’s tips go viral
I see your blog needs some unique articles. Writing
manually is time consuming, but there is solution for this.
Just search for: Masquro’s strategies
If you are interested in topic: earn money online free philippines chat – you should read about
Bucksflooder first
awesome
I read a lot of interesting content here. Probably you
spend a lot of time writing, i know how to save you a
lot of time, there is an online tool that creates readable, google friendly
articles in minutes, just search in google – laranitas free
content source
Thanks for these instructions. I’m spatially challenged and don’t know anything about origami, so the patterns I was finding online were leaving me defeated. But this, with the pictures of the bill so I could keep myself oriented and the very easy to follow instructions gave me my first successful effort of the night! I also appreciate that you taught us what types of folds were we making and why.
Thanks so much, now my decision to fold up a money gift seems doable after all.
🙂
thank you very much for this guide. some of the easiest to follow instructions I’ve seen!!
Thank you Jennifer. I try to make things easy for people who may not be up on all the Origami diagrams and terminology on this site and in my book. Glad you enjoyed it!
🙂 Oh-Some!
gonna use ’em for graduation leis
wow — would love to see that. Could take lots of $$$!
Great tutorial. When my daughter wakes up tomorrow morning, the tooth fairy will have left this under her pillow. 🙂
This was very difficulty to follow. It did not work at all for me.
Sorry to hear that — where did you run into trouble?
Great instructions!! Yes, these are beautiful!
Thank you so much for the easy instructions…I had tried other websites…but yours is the best! : )
Seriously easy directions to follow! You’re a life saver!!!
Thanks Lisa!
This was a complicated one but you had excellent directions. Thank you!
Thank you very much for these instructions! These hearts made great last-minute stocking-stuffers for the family! 🙂
5-6-2k10 It has been a while since I have tried this.I have the book by Nick Robinson and hopefully I can apply tyhe ideas that you provide with his and all my efforts will pay off.The technique that I wish to master is the one thatyou gave me,”change of heart”. Thanks